Day 1
Documentation
We use the 10X Chromium Controller platform to encapsulate and barcode single cells. The following protocol describes the steps for single cell mRNA-seq, but the platform is capable of other analyses including cell surface protein expression, ATAC-seq, dual RNAseq/ATACseq, and Spatial Transcriptomics on intact tissue sections. Refer to the corresponding protocols for these and ensure you are using the appropriate protocol and reagents for your experiment.
What you’ll need
10X reagents (included):
- Chromium Next GEM Single Cell 3ʹ GEM, Library & Gel Bead Kit v3.1 (2 boxes in -20C Freezer and 1 box in -80C Freezer)
- Chromium Next GEM Chip G Single Cell Kit (Room Temp)
- Single Index Kit T Set A (-20C Freezer)
Not included in the 10X kits:
- Cell Suspension (See following Instructions)
- 50% glycerol solution (Room Temp)
- Nuclease-free water (Room Temp)
- 10% Tween 20 (Room Temp)
- Buffer EB (Room Temp)
- SPRI Select Reagent (Room Temp)
Cell Preparation
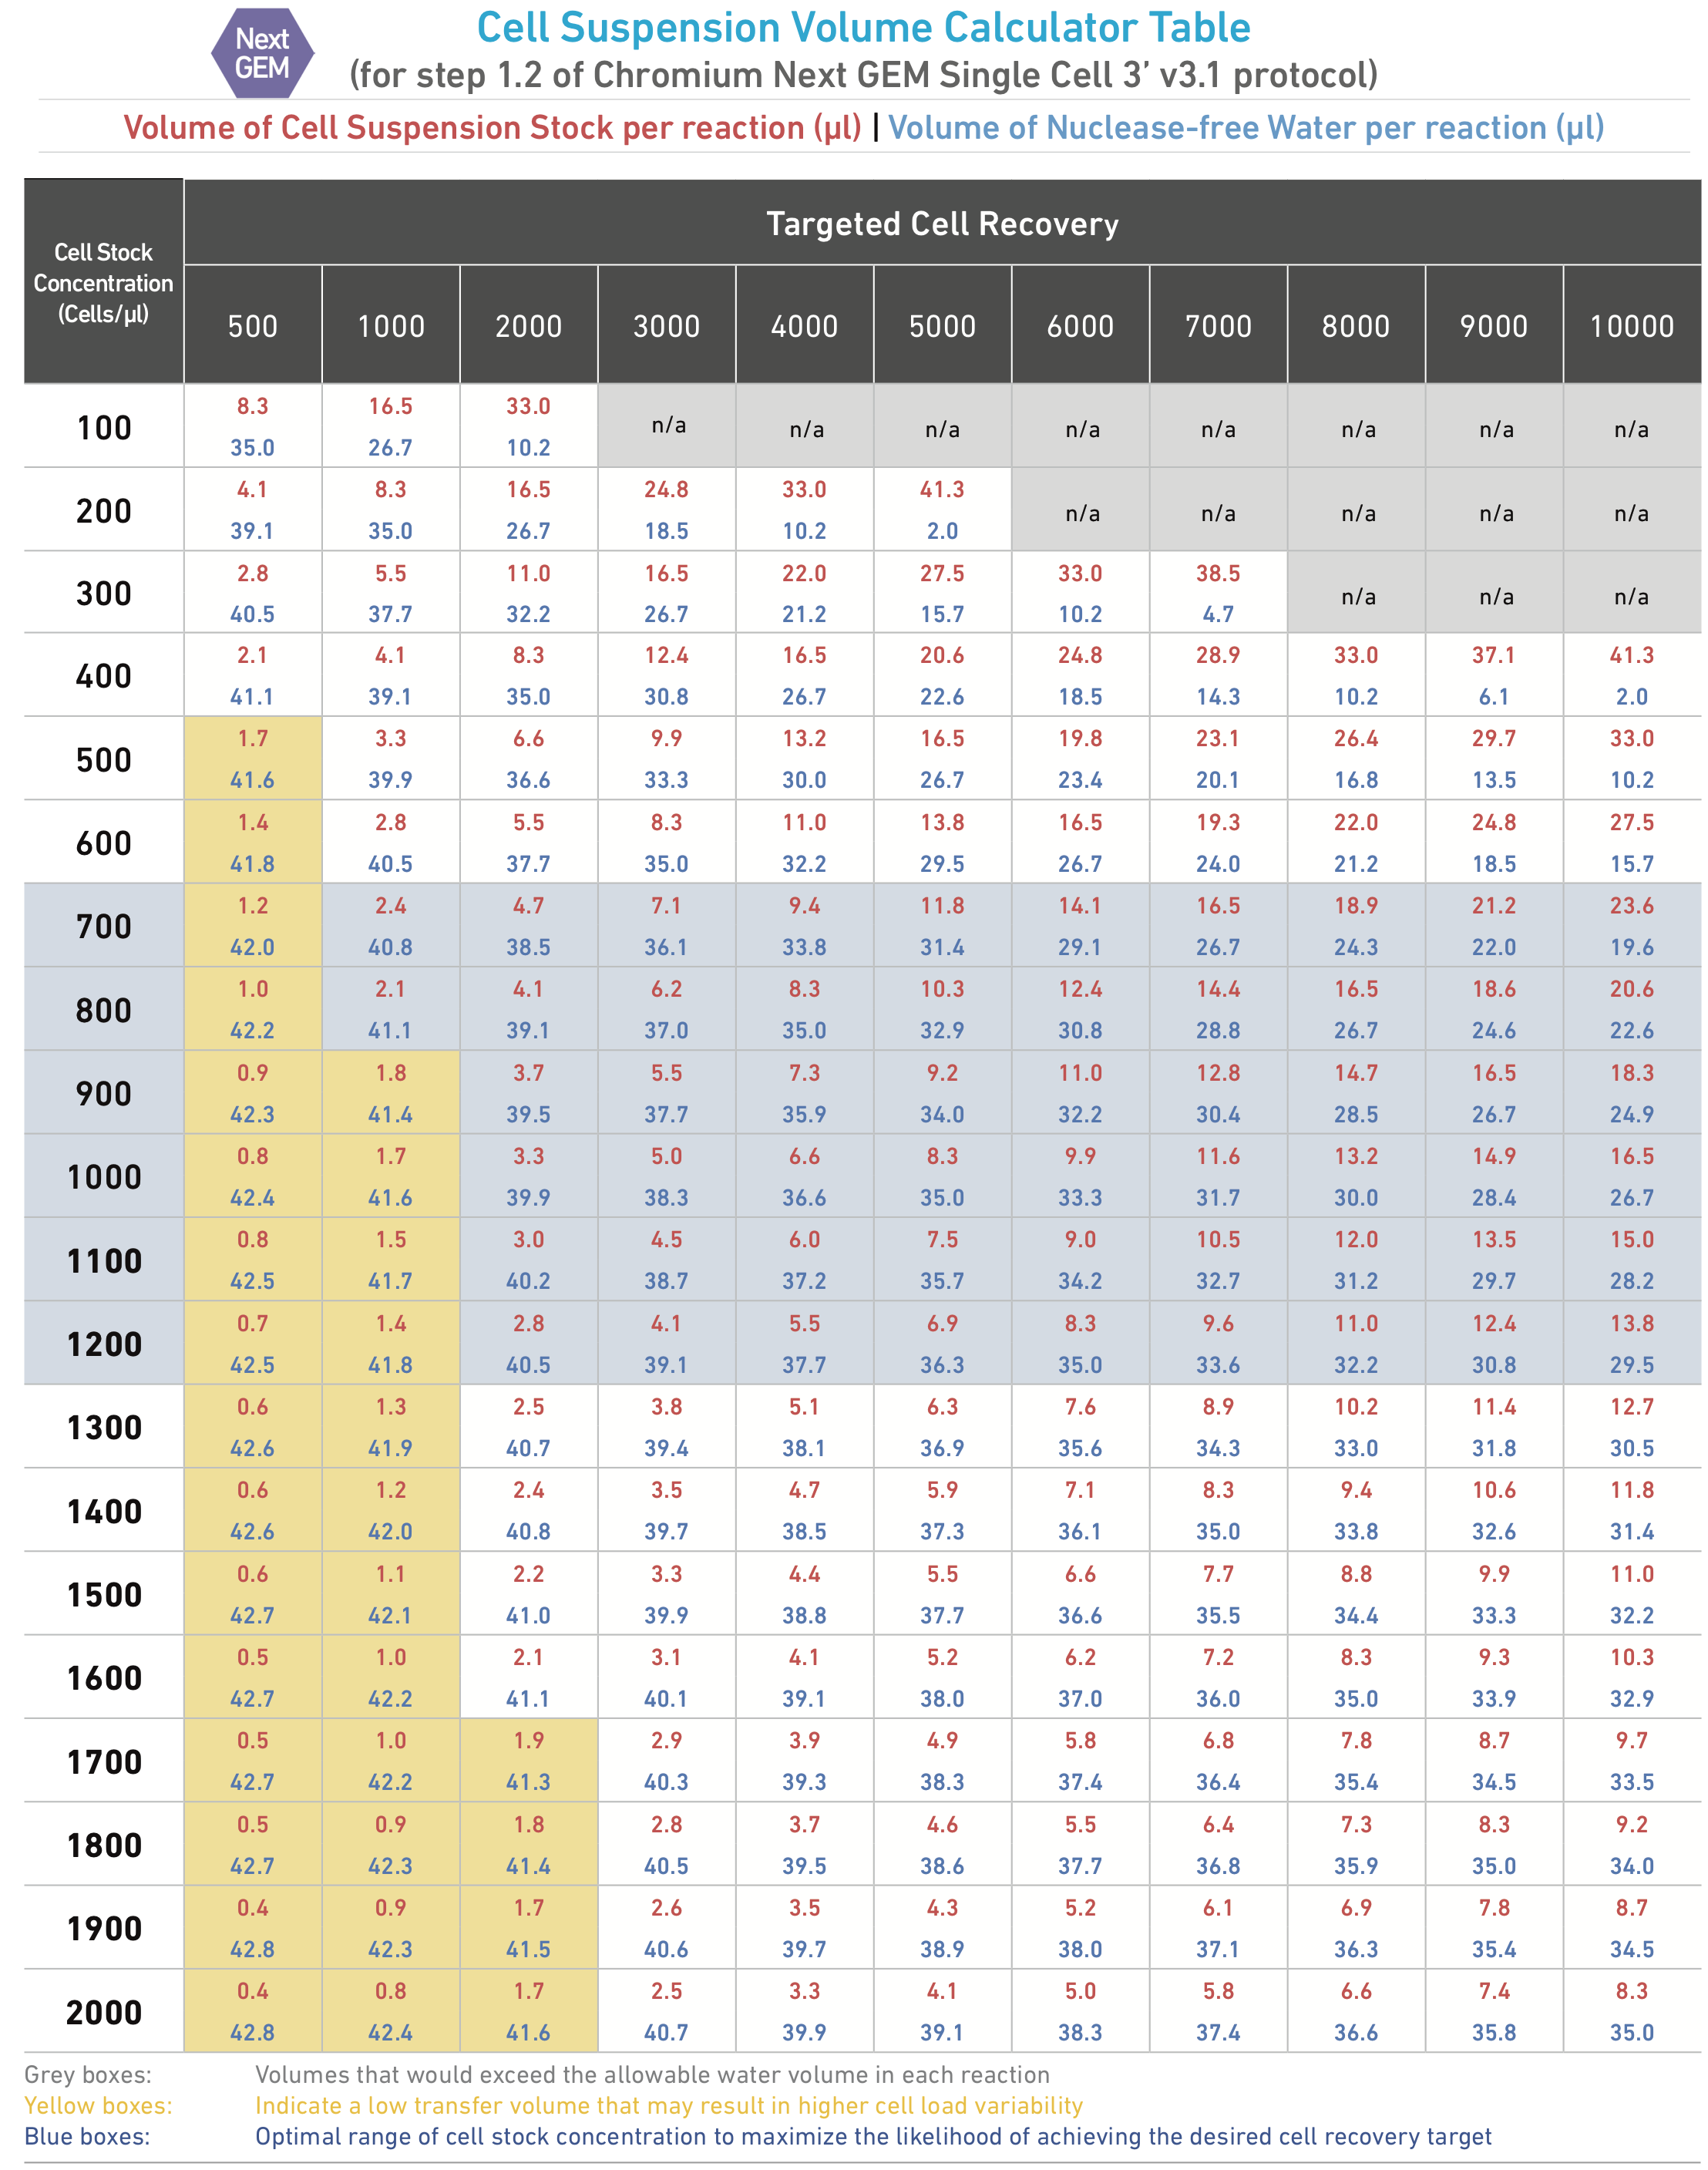
The optimal input cell concentration is 700-1,200 cells/µl. Depending on your concentration, you will need 2.1-23.6 uL of cell suspension as input for each sample. Refer to the Cell Suspension Volume Calculator Table at the end of this section.
While a high concentration of cells is desirable, it also increases the rate of ‘multiplets’. Multiplets occur when a single oil droplet contains 1 barcoded bead and two or more cells. Since each bead has a single barcode, transcripts from multiplets will appear as though they are from the same cell. 10X Genomics recommends 700-1,200 cells/µl in order to maximize cell encapsulation while avoiding excessive multiplets.
For more detail on cell preparation, refer to 10X’s literature, which covers:
Encapsulation
-
Allow the Single Cell 3’ v3.1 Gel Beads to come to room temperature for 30 minutes before loading the chip.
-
Thaw RT Reagent B and Reducing Agent B at room temp.
-
If using a new kit: resuspend Template Switch Oligo in 80uL Low TE Buffer and leave at room temp for at least 30 minutes. If NOT using a new kit, retrieve Template Switch Oligo (already resuspended in TE Buffer) from -80C storage and allow to equilibrate to room temp for at least 30 minutes.
-
Place RT Enzyme C on ice.
-
Prepare Master Mix on ice, per sample (10% extra has already been included):
| Component | Volume/ rxn |
|---|---|
| RT Reagent B | 20.68 uL |
| Template Switch Oligo | 2.64 uL |
| Reducing Agent B I | 2.2 uL |
| RT Enzyme C | 9.57 uL |
| Total 35.09 uL |
-
Add 31.8 uL Master Mix into each tube of a PCR 8-tube strip. Keep these tubes on ice.
-
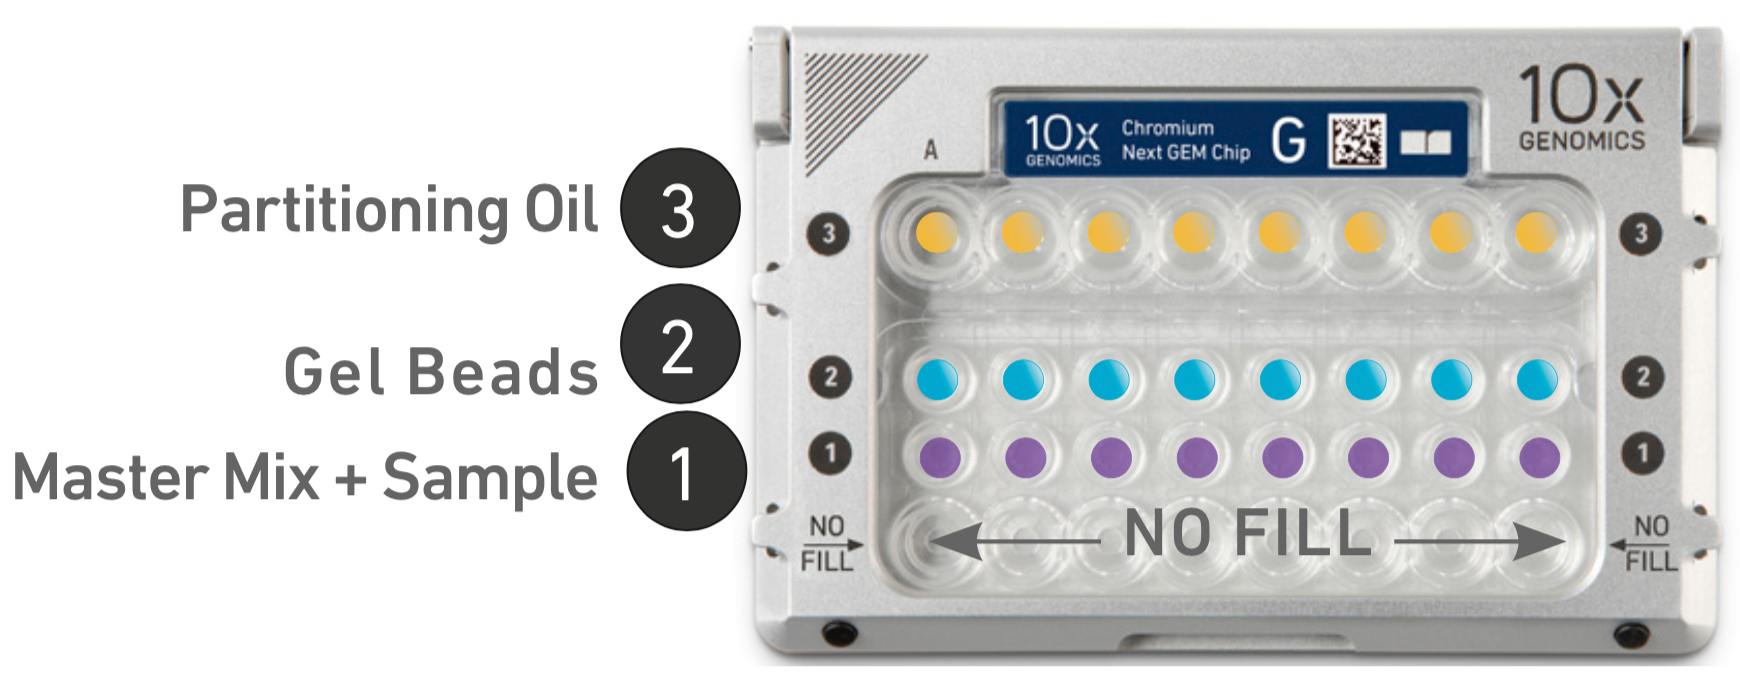
Assemble the Next GEM Chip G by inserting it in the Secondary Holder under the guide (on the left side of the holder when open). The chip label should be at the top and facing toward you. Gently press down the right side of the chip until it clicks into place. Close the lid of the holder over the chip.
- Each column of wells on the chip is occupied by one sample. If loading less than 8 samples on one chip, pipette 50% glycerol into the unused wells without introducing bubbles.
- 70 µl to unused wells in row labeled 1.
- 50 µl to unused wells in row labeled 2.
- 45 µl to unused wells in row labeled 3.
-
Refer to the Cell Suspension Volume Calculator Table. Add the appropriate volume of nuclease free water to the Master Mix, then add the corresponding volume of cell suspension to the Master Mix, for a total of 75 µl in each tube. Gently pipette to mix the cells suspension before adding to the Master Mix. DO NOT ADD WATER DIRECTLY INTO THE CELL SUSPENSION.
-
Load Row Labeled 1 with 70uL Master Mix without introducing bubbles.
-
To prepare the gel beads, place the gel bead strip into the 10x Vortex Adapter. Vortex the gel beads in the adapter for 30 seconds, then remove the gel bead strip from the holder and centrifuge ~5 seconds. Place the gel bead strip back in the holder and attach the lid.
-
To load Row Labeled 2, puncture the foil seal of the gel bead tubes and aspirate and dispense 50uL gel beads without introducing bubbles. Wait 30 seconds.
-
Load Row Labeled 3 with 45uL partitioning oil, avoiding bubbles. Your chip should now look like the image below, with the unused wells filled with appropriate volumes of 50% glycerol if loading less than 8 samples.
-
To attach the 10x gasket, align the notch with the top left-hand corner. Ensure the gasket holes are aligned with the wells. The smooth side of the gasket should be facing toward the wells. Do not touch the smooth side or press down on the gasket. Keep the assembly horizontal.
-
Bring the assembly over to the 10x Chromium Controller. Turn on the machine and press the eject button when it appears on the screen.
-
Place the assembled chip with the gasket in the tray, ensuring that the chip stays horizontal. The chip should be placed face up, with the notched corner in the upper left and the chip label at the top. Press the button to retract the tray. Confirm the Chromium Chip G program on screen. Press the play button. At completion of the run (~18 min), the Controller will chime. Immediately proceed to the next step.
Transfer and GEM-RT Incubation
-
Place a tube strip on ice
-
Press the eject button of the Controller and remove the chip. Turn off the Controller after use.
-
Discard the gasket. Open the chip holder. Fold the lid back until it clicks to expose the wells at 45 degrees.
-
Check the volume in rows labeled 1-2. Abnormally high volume in any well indicates a clog.
-
Slowly aspirate 100 μl GEMs from the lowest point of each recovery well in the top row labeled 3 without creating a seal between the tip and the bottom of the well.
-
As you aspirate the GEMs, check their appearance in the pipette tip. GEMs should appear mostly opaque and consistent white. Excess Partitioning Oil (clear) in the pipette tip indicates a potential clog.
-
Over the course of ~20 sec, dispense GEMs into the tube strip on ice with the pipette tips against the sidewalls of the tubes.
-
Attach the deep well head to the thermocycler, if not already in place. Incubate samples in the thermocycler under the protocol 10x scRNAseq->GEM INCUBATE (53C for 45min, 85C for 5min, 4C hold, lid 53C, 125uL volume).
-
If doing the entire protocol in 3 days, end Day 1 here. Store at 4°C for up to 72 h or at −20°C for up to a week.
Day 2
Post GEM-RT Cleanup
-
Equilibrate Reducing Agent B, cDNA primers, Dynabeads and Tapestation HSD5000 screentape and reagents to room temp for at least 30 minutes before use.
-
Place Amp Mix on ice.
-
Thaw Cleanup Buffer on heatblock at 65C for 10min, vortexing at 5min and 10min. Check that there are no visible crystals and vortex more if needed.
-
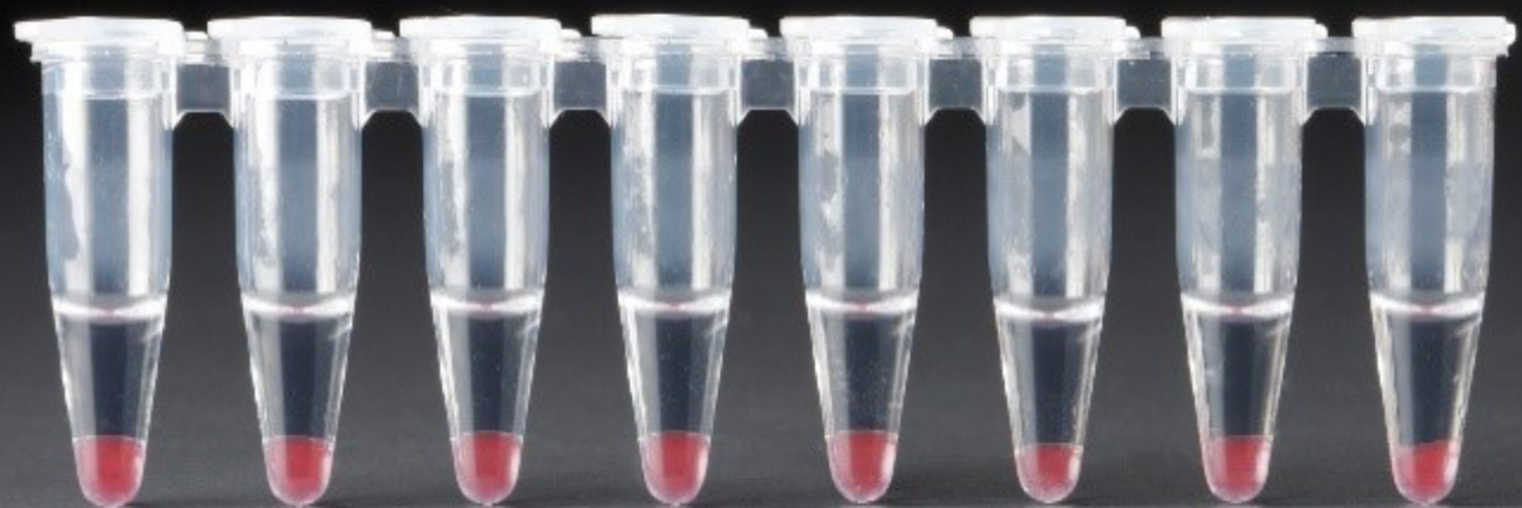
Add 125μl Recovery Agent to each sample at room temperature. DO NOT pipette mix or vortex the biphasic mixture. Wait 2 min. This should separate into a clear aqueous phase on top and a pink layer on bottom with no opaque emulsion. A smaller aqueous phase volume indicates a clog during GEM generation.
-
Slowly remove and discard 125 μl Recovery Agent/Partitioning Oil (pink) from the bottom of the tube. DO NOT aspirate any aqueous sample. There will still be a small remaining volume of pink Recovery Agent/Partitioning Oil after removal. Observe these volumes across your samples as abnormal volumes may indicate a wetting failure or clog during encapsulation. Below is an example of successful samples.
- Prepare Dynabeads Cleanup Mix per sample (10% extra has already been included):
| Component | Volume/ rxn |
|---|---|
| Cleanup Buffer | 200.2 uL |
| Dynabeads MyOne Silane | 8.8 uL |
| Reducing Agent B I | 5.5 uL |
| Nuclease-free Water | 5.5 uL |
| Total 220 uL |
-
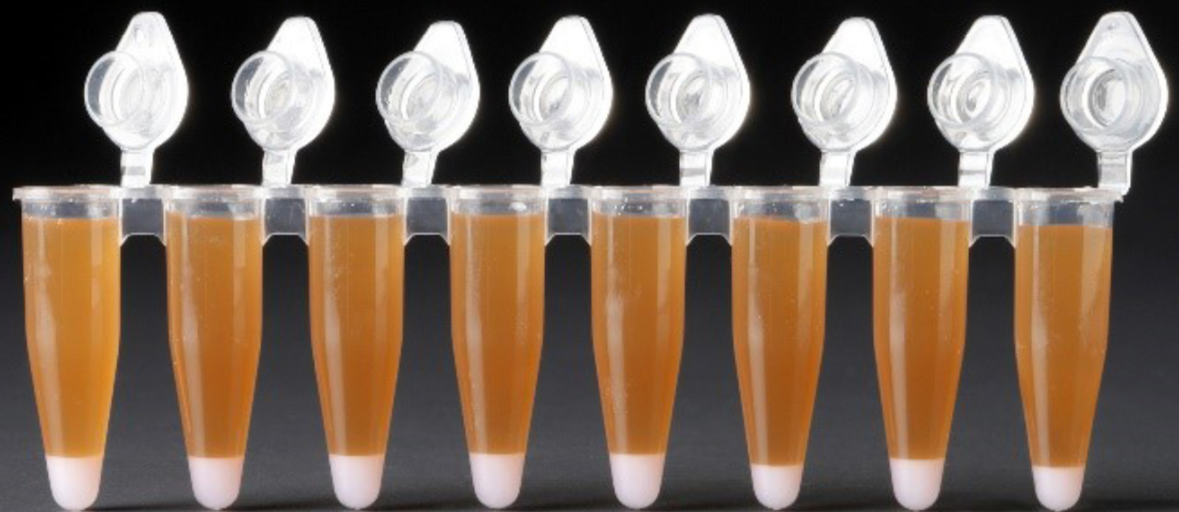
Vortex Dynabeads Cleanup Mix and add 200uL to each sample. Pipette to mix 10 times.
-
Incubate for 10 min at room temp. Pipette to mix again at 5 min after start of incubation. You should end up with a large brown layer of Dynabeads Cleanup Mix at the top and a smaller white Recovery Agent/Partitioning Oil layer below. Observe these volumes across your samples as abnormal volumes may indicate a wetting failure or clog during encapsulation. Below is an example of successful samples.
- Prepare Elution Solution I per sample (10% extra has already been included):
| Component | Volume/ rxn |
|---|---|
| Buffer EB | 107.8 uL |
| 10% Tween 20 | 1.1 uL |
| Reducing Agent B | 1.1 uL |
| Total 110 uL |
-
Vortex and centrifuge Elution Solution briefly.
-
At the end of the 10min incubation, place the sample tube strip on a 10x Magnetic Separator in the HIGH position until solution clears (~5 min).
-
Remove and discard the supernatant.
-
Keeping the samples on the magnet, add 300uL 80% ethanol.
-
Wait 30 sec, then remove the ethanol.
-
Keeping the samples on the magnet, add 200uL 80% ethanol.
-
Wait 30 sec, then remove the ethanol.
-
Centrifuge briefly. Place on the magnet on LOW
-
Remove remaining ethanol. Air dry for 1 min.
-
Remove from the magnet. Immediately add 35.5 μl Elution Solution I.
-
Pipette to mix (pipette set to 30 μl) without introducing bubbles.
-
Incubate 2 min at room temperature.
-
Place on the magnet on LOW until the solution clears.
-
Transfer 35 μl sample to a new tube strip.
cDNA Amplification, Cleanup, and QC
- Prepare cDNA Amplification Mix on ice (10% extra has already been included):
| Component | Volume/ rxn |
|---|---|
| Amp Mix | 55 uL |
| cDNA Primers | 16.5 uL |
| Total 71.5 uL |
-
Vortex and centrifuge briefly, then add 65uL Mix to the 35uL of sample. Pipette to mix 15x (pipette set to 90uL) and centrifuge briefly.
-
Incubate in the thermocycler (deep well head) with the program 10x scRNAseq->cDNA Amp. Adjust the number of total cycles based on the targeted cell recovery (determined by the Cell Suspension Volume Calculator Table in Day 1).
| Targeted Cell Recovery | Total Cycles |
|---|---|
| <500 | 13 |
| 500-6000 | 12 |
| >6000 | 11 |
-
Vortex to resuspend the SPRIselect reagent. Add 60 μl SPRIselect reagent to each sample and pipette mix 15x (pipette set to 150 μl).
-
Incubate 5 min at room temperature.
-
Place on the magnet on HIGH until the solution clears.
-
Remove the supernatant.
-
Add 200 μl 80% ethanol to the pellet. Wait 30 sec.
-
Remove the ethanol.
-
Repeat steps 8 and 9 for a total of 2 washes.
-
Centrifuge briefly and place on the magnet on LOW.
-
Remove any remaining ethanol. Air dry for 2 min. DO NOT exceed 2 min as this will decrease elution efficiency.
-
Remove from the magnet. Add 40.5μl Buffer EB. Pipette mix 15x.
-
Incubate 2 min at room temperature.
-
Place the tube strip on the magnet on HIGH until the solution clears.
-
Transfer 40 μl sample to a new tube strip.
-
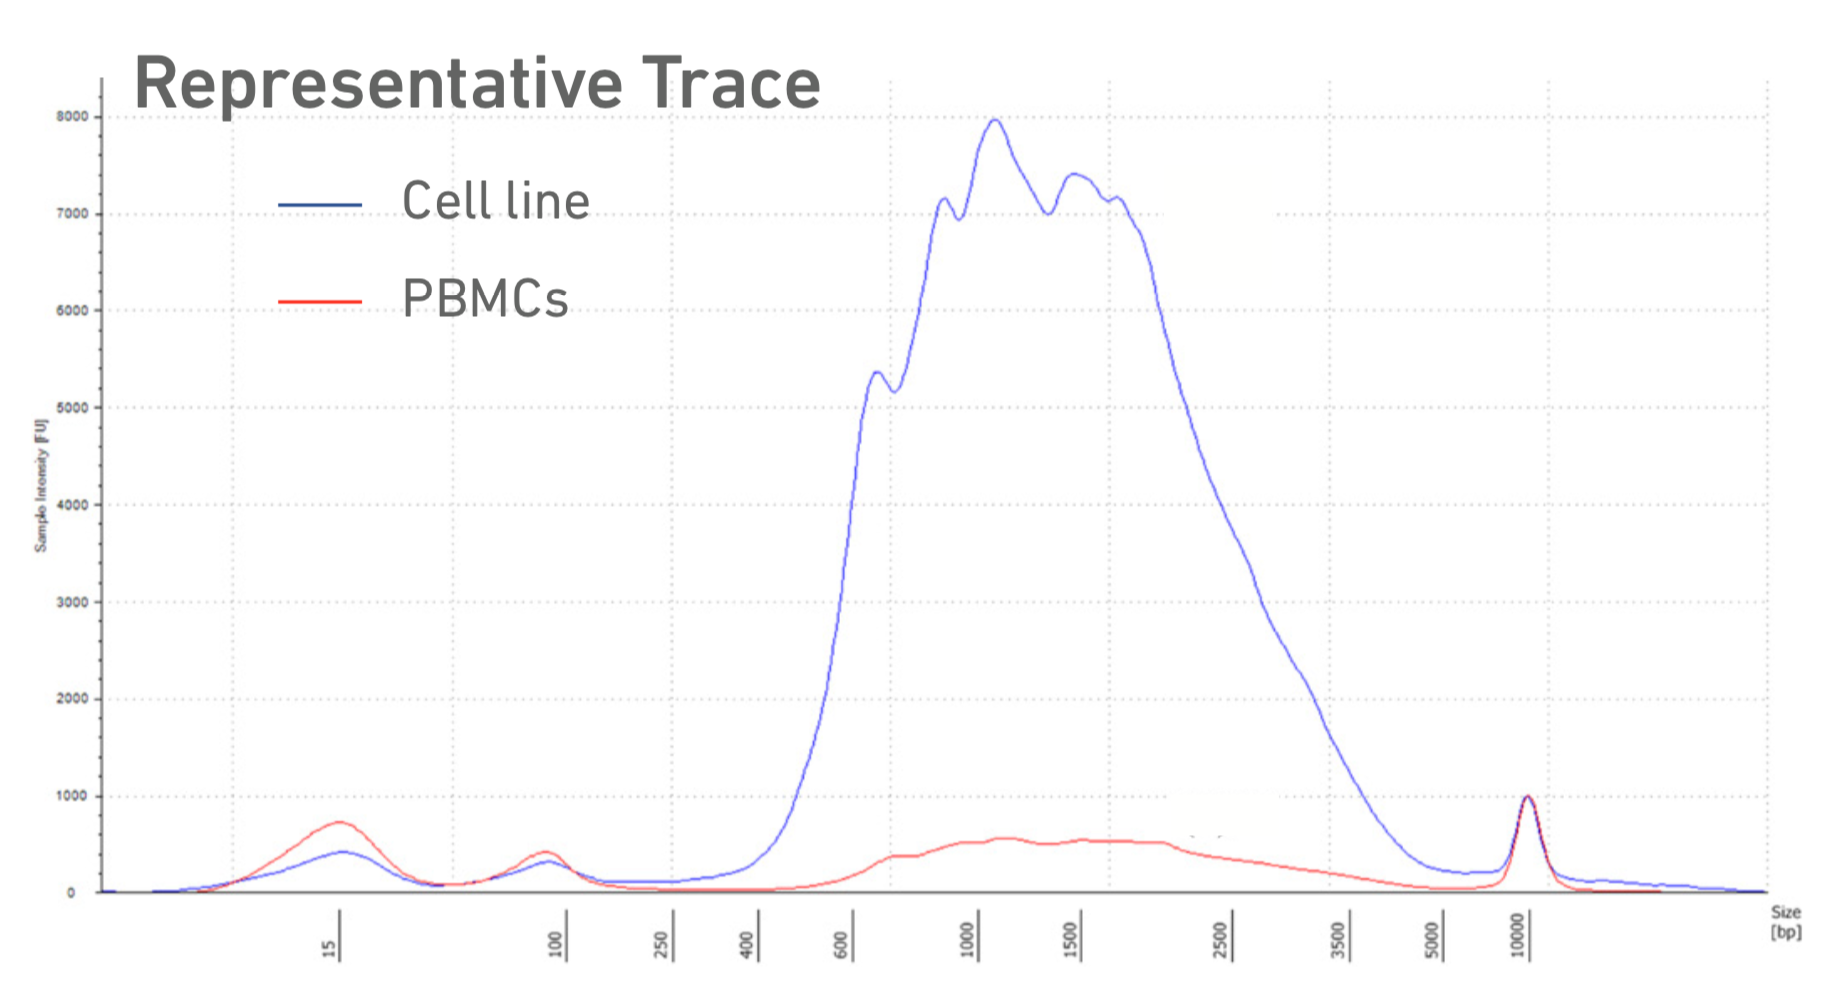
Run sample on Tapestation with the HSD5000 assay. There should be a broad, tall peak from ~500-3000bp. Record the concentration from the 200-9000bp region.
-
This is the end of Day 2. Store at 4°C for up to 72 h or at −20°C for up to 4 weeks.
-
Example cDNA trace
Day 3
Fragmentation, End Repair, and A-tailing
-
Equilibrate to room temp at least 30 minutes before use: Fragmentation Buffer, Adaptor Oligos, Ligation buffer, SI Primer, Single Index Plate T Set A, and Tapestation HSD1000 screentape and reagents.
-
Place Fragmentation Enzyme, DNA Ligase, and Amp Mix on ice.
-
Start the thermocycler protocol 10x scRNAseq -> Fragmentation to pre-cool block.
-
Vortex Fragmentation Buffer. Verify there is no precipitate.
-
Prepare Fragmentation Mix on ice, per sample (10% extra has already been included):
| Component | Volume/ rxn |
|---|---|
| Fragmentation Buffer | 5.5 uL |
| Fragmentation Enzyme | 11 uL |
| Total 16.5 uL |
-
Pipette Fragmentation Mix and centrifuge briefly. Keep on ice.
-
Transfer 10uL from Day 2’s purified cDNA sample into a new tube strip. The remaining 30 μl (75%) cDNA sample can be stored at 4°C for up to 72 h or at −20°C for up to 4 weeks for generating additional 3ʹ Gene Expression libraries.
-
Add 25 μl Buffer EB to each sample.
-
Add 15 μl Fragmentation Mix to each sample.
-
Pipette mix 15x (pipette set to 35 μl) on ice. Centrifuge briefly.
-
Transfer into the pre-cooled thermal cycler (4°C) and press “SKIP” to start the rest of the protocol.
-
Vortex to resuspend SPRIselect reagent. Add 30 μl SPRIselect reagent to each sample. Pipette mix 15x (pipette set to 75 μl).
-
Incubate 5 min at room temperature.
-
Place on the magnet on HIGH until the solution clears. DO NOT DISCARD SUPERNATANT.
-
Transfer 75 μl supernatant to a new tube strip.
-
Vortex to resuspend SPRIselect reagent. Add 10 μl SPRIselect reagent to each sample. Pipette mix 15x (pipette set to 80 μl).
-
Incubate 5 min at room temperature.
-
Place on the magnet on HIGH until the solution clears.
-
Remove 80 μl supernatant. DO NOT discard any beads.
-
Add 125 μl 80% ethanol to the pellet. Wait 30 sec.
-
Remove the ethanol.
-
Repeat steps 9 and 10 for a total of 2 washes.
-
Centrifuge briefly. Place on the magnet on LOW until the solution clears. Remove remaining ethanol. DO NOT over dry to ensure maximum elution efficiency.
-
Remove from the magnet. Add 50.5 μl Buffer EB to each sample. Pipette mix 15x.
-
Incubate 2 min at room temperature.
-
Place on the magnet on HIGH until the solution clears.
-
Transfer 50 μl sample to a new tube strip.
Adaptor Ligation
- Prepare Adaptor Ligation Mix, per sample (10% extra has already been included):
| Component | Volume/ rxn |
|---|---|
| Ligation Buffer | 22 uL |
| DNA Ligase | 11 uL |
| Adaptor Oligos | 22 uL |
| Total 55 uL |
-
Pipette mix and centrifuge briefly.
-
Add 50 μl Adaptor Ligation Mix to 50 μl sample. Pipette mix 15x (pipette set to 90 μl). Centrifuge briefly.
-
Incubate in a thermal cycler (deep well head) with the protocol under 10x scRNAseq -> Adaptor Ligation (20C for 15min, 4C hold, lid 30C, 100uL volume).
-
Vortex to resuspend SPRIselect Reagent. Add 80 μl SPRIselect Reagent to each sample. Pipette mix 15x (pipette set to 150 μl).
-
Incubate 5 min at room temperature.
-
Place on the magnet HIGH until the solution clears.
-
Remove the supernatant.
-
Add 200 μl 80% ethanol to the pellet. Wait 30 sec.
-
Remove the ethanol.
-
Repeat steps 9 and 10 for a total of 2 washes.
-
Centrifuge briefly. Place on the magnet on LOW.
-
Remove any remaining ethanol. Air dry for 2 min. DO NOT exceed 2 min as this will decrease elution efficiency.
-
Remove from the magnet. Add 30.5 μl Buffer EB. Pipette mix 15x.
-
Incubate 2 min at room temperature.
-
Place on the magnet on LOW until the solution clears.
-
Transfer 30 μl sample to a new tube strip.
PCR, Cleanup, and Library QC
- Prepare Sample Index PCR Mix, per sample (10% extra has already been included):
| Component | Volume/ rxn |
|---|---|
| Amp Mix | 55 uL |
| SI Primer | 11 uL |
| Total 66 uL |
-
Add 60 μl Sample Index PCR Mix to 30 μl sample.
-
Add 10 μl of an individual Single Index to each well and record the well ID used. Pipette mix 5x (pipette set to 90 μl). Centrifuge briefly.
-
Incubate in a thermocycler (deep well head) with the protocol under 10x scRNAseq -> PCR. The total number of cycles is determined by the cDNA yield and input, based on the tapestation reading for concentration at the end of Day 2.
(cDNA concentration from tapestation ng/uL x 40uL elution volume)/4 = input
| cDNA Input | Total Cycles |
|---|---|
| 0.25-25 ng | 14-16 |
| 25-150 ng | 12-14 |
| 150-500 ng | 10-12 |
| 500-1000 ng | 8-10 |
| 1000-1500 ng | 6-8 |
| >1500 ng | 5 |
-
Vortex to resuspend the SPRIselect reagent. Add 60 μl SPRIselect Reagent to each sample. Pipette mix 15x (pipette set to 150 μl).
-
Incubate 5 min at room temperature.
-
Place the magnet on HIGH until the solution clears. DO NOT discard supernatant.
-
Transfer 150 μl supernatant to a new tube strip.
-
Vortex to resuspend the SPRIselect reagent. Add 20 μl SPRIselect Reagent to each sample. Pipette mix 15x (pipette set to 150 μl).
-
Incubate 5 min at room temperature.
-
Place the magnet on HIGH until the solution clears.
-
Remove 165 μl supernatant. DO NOT discard any beads.
-
With the tube still in the magnet, add 200 μl 80% ethanol to the pellet. Wait 30 sec.
-
Remove the ethanol.
-
Repeat steps 13 and 14 for a total of 2 washes.
-
Centrifuge briefly. Place on the magnet on LOW. Remove remaining ethanol.
-
Remove from the magnet. Add 35.5 μl Buffer EB. Pipette mix 15x.
-
Incubate 2 min at room temperature.
-
Place on the magnet on LOW until the solution clears.
-
Transfer 35 μl to a new tube strip.
-
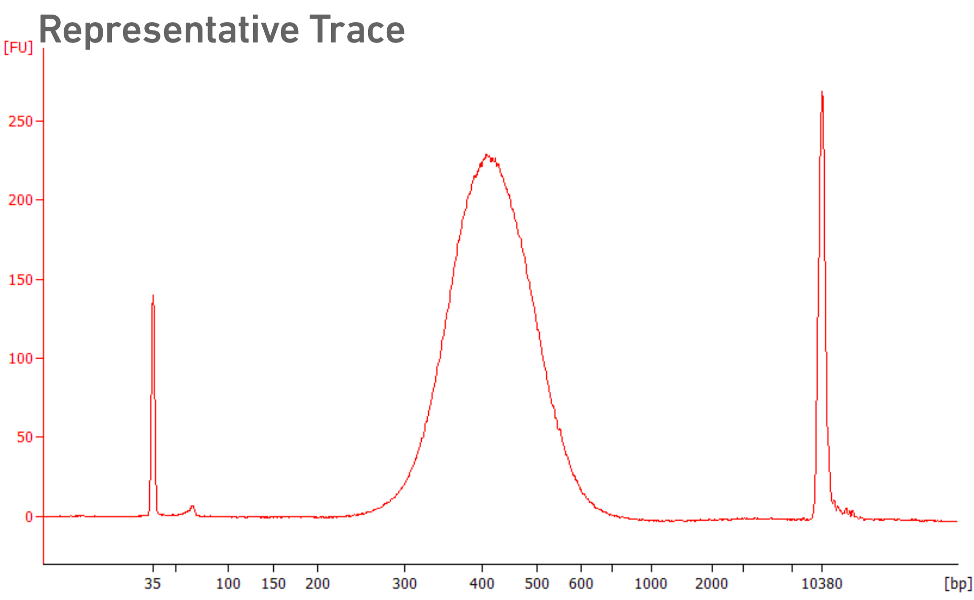
Run sample on Tapestation with the HSD1000 assay. There should be a peak at ~400 bp.
-
Sample can be run on Qubit HS dsDNA at this point, or before sequencing.
-
Store at 4°C for up to 72 h or at −20°C for long-term storage.
Sequencing Guidelines
Normalize and Pool
-
Quantify each of your libraries on Qubit. For most libraries, using the HS dsDNA Qubit assay with 2uL of input will yield a reading. Record the concentration in ng/uL for each library.
-
Run your samples on Tapestation with either the HSD5000 or the HSD1000 assay. Remember to allow Tapestation reagents to sit at room temperature for at least 30 minutes before use. Save your Tapestation results by going to File -> Create Report -> Save as pdf. This file can then be emailed or uploaded to Asana. For the base pair length, we usually use the value of the peak identified by the Tapestation analysis software. This value is shown both on the tracing itself and in the Peak Table for each sample.
-
Download our 10X nM Conversion Calculator here. Enter the concentration (from Qubit) and the base pair length (from Tapestation) in the appropriate cells and it will give you the nM concentration for each library. You also need the Target Cell Recovery values. Normalize and pool all your libraries to 4, 2, 1, or 0.5 nM in a LoBind microcentrifuge tube. If you need to dilute your libraries, we recommend using at least 2uL to minimize pipetting errors. The example sheet of the calculator provides further detail.
-
Quantify your pool on Qubit and enter into the calculator sheet to check that your pool is close to the nM concentration you normalized to.
Setup Run in Basespace
-
Sign into Basespace, then go to the Prep tab, Biological Samples, and select Import Samples on the upper right. Use Illumina’s Sample Import Template, but only create a single sample for your pool. The SampleID and Name can be the same, but make sure they are unique for each sample. Species can be left blank. Upload the completed .csv to import your samples.
-
Continue to Prep Libraries. This library prep requires a custom setting that gives the samples a single dummy index. On our Basespace account, select the library prep kit “10X Test” from the list. The your project name as the Plate ID. For each sample, check the box next to it on the left, then drag the sample name to the appropriate index well.
-
Proceed to Pool Libraries. Select all your samples on the left, then drag and drop in the pool on the right. Name the pool your project name.
-
Continue to Plan Run. Select NextSeq and name your run your project name. Select Single Read. If using a 150 Cycle High Output Kit, enter the following cycles:
| Read | Cycles |
|---|---|
| Read 1 | 28 |
| Index i7 (Index 1) | 8 |
| Index i5 (Index 2) | 0 |
| Read 2 | 91 |
If you choose to use a 75 Cycle High Output Kit, entering the following:
| Read | Cycles |
|---|---|
| Read 1 | 28 |
| Index i7 (Index 1) | 8 |
| Index i5 (Index 2) | 0 |
| Read 2 | 56 |
- Press Sequence to complete planning the run. The run will now be available for selection on the sequencer.
Loading the Sequencer
The next step is to dilute and denature the prepared libraries. Illumina’s general guidelines for this on the NextSeq can be found here.
Illumina’s system guide for the NextSeq, which covers the sequencing workflow, can be found here.
Your final loading concentration should be 1.8pM.
- These run settings generate FASTQ files that are not separated by sample and will show up in Basespace differently. To download the FASTQ from Basespace, go to the Project, Samples, Select the one that says “Undetermined,” and the files will be listed. 10X recommends downloading the .bcl files and using Cell Ranger to demultiplex. More information can be found here